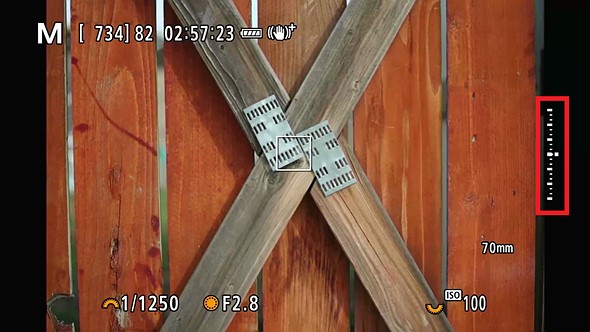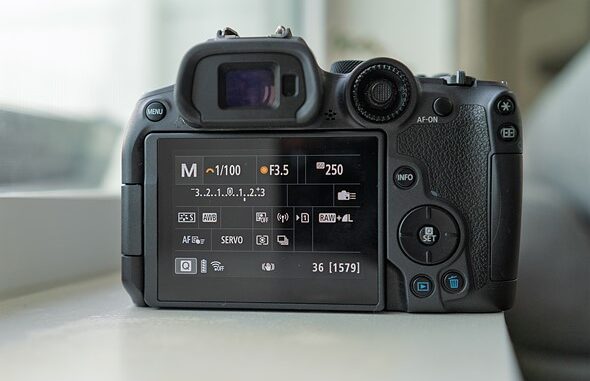
Dialing in your aperture, shutter speed and ISO doesn’t have to be a game of guesswork when using manual mode. If you’re consistently getting overly dark or light photos, you may just need to learn how to use your light meter. Luckily, almost every digital camera features a built-in meter that measures the light in a scene, making it easier to get your settings right. It’s an integral tool for consistently achieving well-exposed images without lots of trial and error.
What is the light meter?
Your camera’s light meter simply measures the available light in a scene. Then, when in manual mode (M), the camera displays the impact on exposure (which you can read about here) on a scale or with positive or negative numbers that you can see through the viewfinder and on the rear screen. The scale tells you whether the camera thinks you need more or less light to have a well-exposed photo.
If you’re using P, A or S modes, the camera sets the exposure and ISO based on this light reading and keeps the light meter scale at zero. As a result, you don’t need to worry about the light meter in those modes.
How to use the light meter
It’s important to note that each camera manufacturer formats the light meter slightly differently, and many offer different views based on how you have your display set up. As a result, it’s important to look carefully or even check your manual. On some cameras, the scale is vertical; on others, it is horizontal. Some don’t show a scale at all in certain display modes and instead only use numerical values.
No matter how the light meter is formatted, it will have negative and positive values. Negative numbers represent an image that is too dark (underexposed), and positive numbers represent a too-light (overexposed) photograph. The middle of the scale is zero, which signifies what the camera thinks is a properly exposed photo.
The numbers refer to stops, which are applicable for aperture, shutter speed and ISO.
The numbers refer to stops, which are applicable for aperture, shutter speed and ISO. A full stop is a way of saying half or twice the amount of light, but your camera also lets you change by one-third (or sometimes half) stop steps. That’s why you’ll see smaller marks in between big ones on the scale (or, for example, -1.7 instead of just -1.0). If you want to change a setting by a full stop, it takes three clicks of your dial.
When your camera measures the amount of light, it displays the exposure level based on your current settings. Some cameras use a white rectangle or triangle under the light meter to display where your exposure falls on the scale. Others will show a line of boxes extending from the center to the current exposure level.
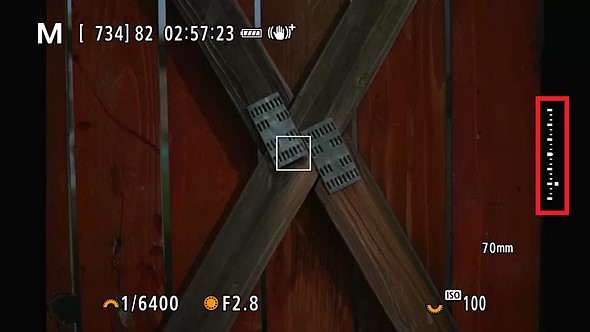 |
| This image is two full stops underexposed, as you can see by the small white box next to the second large tick mark on the light meter. |
If you see the marking at a negative number, it means your photograph is darker than the camera calculates as correct. Changing to a slower shutter speed, a wider aperture or, when necessary, a higher ISO will lighten the image. If the marking is all the way at the edge of the scale, you’ll need to make a larger adjustment of one (or a combination) of those settings until you get the light meter to reflect zero (or near it). If it’s already close to zero, a click or two on your dial should get you in the right spot. For example, if the light meter says -1.0, you can change your shutter speed or aperture by one full stop (three clicks of the dial) to balance exposure.
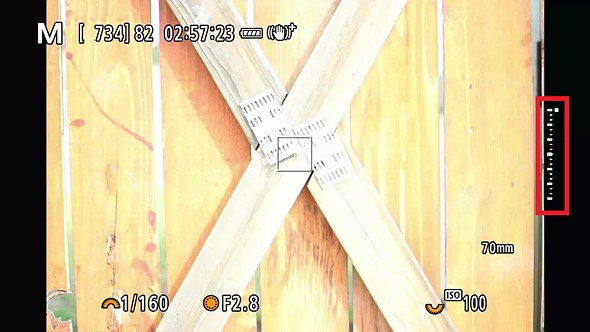 |
| This image is three stops overexposed, as you can see by the small white square at the top of the scale. |
If you see the marking at a positive number, it means your photograph is lighter than the camera thinks is correct. Lowering the ISO or reducing exposure with a fast shutter speed or smaller aperture will darken the image. Again, keep changing one (or a combination) of those settings until the light meter is at zero. For example, if your light meter says +2.0, it means you are two stops overexposed and reducing your ISO by two full stops (so six clicks of a dial) will get the light meter to zero.
Why does the light meter matter?
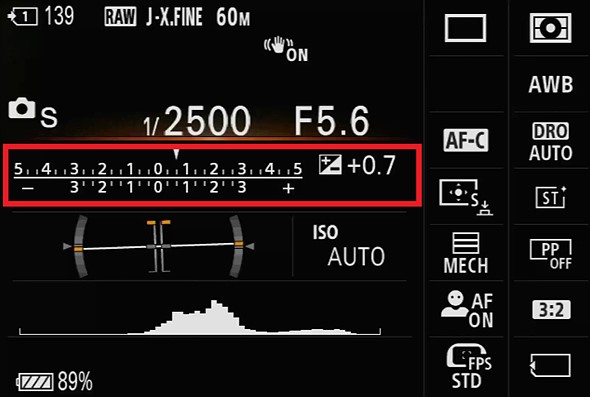 |
| Sony cameras can also display the full light meter scale, which you can see highlighted in this screenshot with the red box. |
Digital photography certainly makes it easy (and affordable) to use trial and error to dial in exposure. However, that process takes time, and many types of photography don’t give you a second chance to take the photo. Knowing how to read your light meter can help you get your ideal exposure faster so you don’t miss the critical moment.
Additionally, while modern cameras offer quite impressive dynamic range (the difference between the darkest areas of a photo and the lightest), giving you a degree of processing leeway, there is still a limit. If you overexpose a photo too much, you may end up with blown-out highlights, meaning a solid white area with no texture or detail. On the other hand, if your photo is too underexposed, you may notice noise when trying to brighten the image while editing, provided you’re even able to bring the detail back.
Getting your exposure closer to correct in-camera will help you preserve critical details.
Getting your exposure closer to correct in-camera will help you preserve critical details and can maximise image quality. It will also make your photographs easier to share as-is if you don’t edit them, and faster to edit if you do.
It’s also worth mentioning that most mirrorless cameras provide an exposure preview in the electronic viewfinder or on the rear display. That preview will show you a live view of what your photograph will look like as you change aperture, shutter speed or ISO. Screens can help give you an idea of your photograph’s exposure, but they aren’t very reliable for precise information. They can be hard to see in bright sun, and changing the display’s brightness can drastically change your photo’s appearance. That’s why the light meter (and the histogram) is so important.
Don’t forget to use your judgment (and histogram)
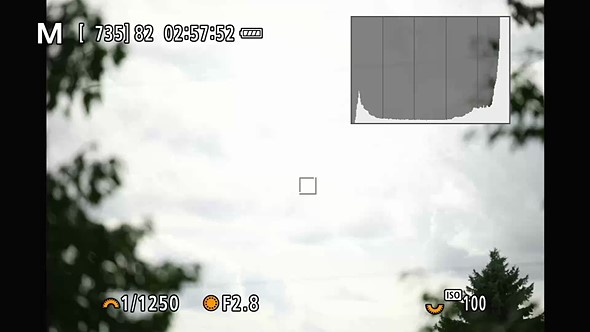 |
| A histogram (the chart in the top right of this screenshot) used in combination with the light meter can help prevent overly under- or overexposed images. |
While your light meter is a useful tool, it’s not the end-all, be-all. After all, your camera doesn’t know what you are taking photos of or what type of look you are after, so you still need to use your judgment and other tools at your disposal. That includes using different metering modes and the histogram.
Ultimately, as the photographer, you need to decide what level of exposure is best for what you’re trying to convey.
Even with different metering modes, there are times when you need to use the light meter as a rough guide but not a silver bullet. Tricky lighting conditions, such as high-contrast scenes, can throw off your meter, and you will need to decide whether to prioritize highlights or shadows in your exposure. Additionally, there may be times you want to purposefully keep the image darker or lighter to reflect an experience, such as photographing in low light. Ultimately, as the photographer, you need to decide what level of exposure is best for a given scene, what you’re trying to convey and your style.

